Table of Contents
2.4.1 Query building support
The query tool ANNIS supports you in different way. We list them up here.
Annotations per sub-corpus
Every sub-corpus in the list has more information about its annotations behind the <i> next to its name. This helps you find available annotations per (sub-)corpus.
Query Builder: Word sequences and meta information
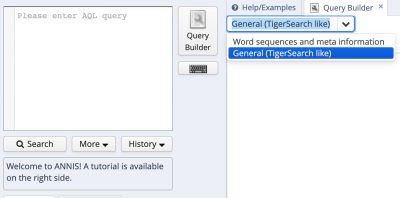
This is probably the easiest way to build your (complex) query step by step.You find the Query Builder at the top, to the right of the query field:
 Figure 1: Starting the query builder
It comes in two flavors, as you can see. You can use the "General (TigerSearch like)" function, which is a bit more demanding or you can use the "Word sequences and meta information" function. To switch between these two functions, just press the arrow down.
Let us first look at the "Word sequences and meta information" function. This function helps you build queries per (sub-)corpus, so when you first open it, all sections have a button "initialize". When you press this button, the tool looks for available fields and options for the (sub-)corpus that you have selected at that moment. When you switch corpora, you have to re-initialize the tool by closing its tab and starting it anew.
The tool is set up into different sections, which we will discuss in more detail in the following.
Linguistic sequence
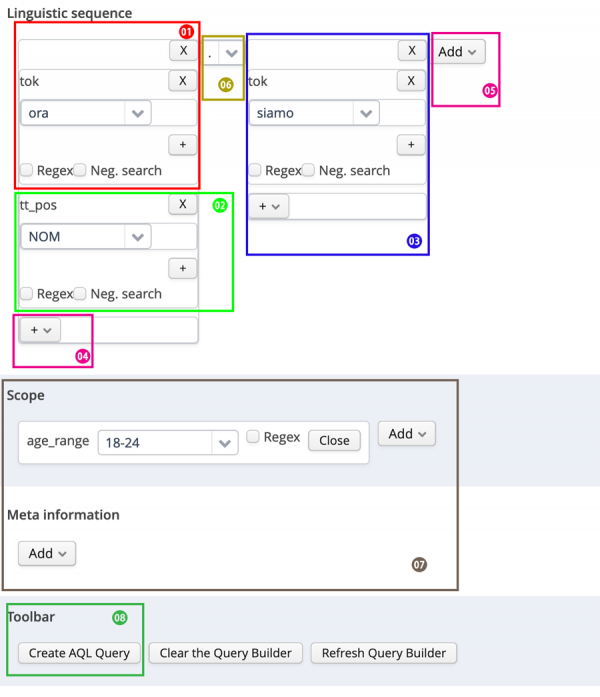
In the first section you define the sequence of tokens and their attributes that you want to query for. Figure 2 represents the following query:
- A first token with the value ora
- The same token has to have the part of speech annotation
tt_pos="NOM" - A second token with the value siamo has to followed follow the first one.
- The second token has to follow the first one directly, i.e. with no other tokens in between.
As you can see in Figure 2, properties that apply to the same token are listed below each other (01 and 02 in Figure 2), while sequences of tokens are listed in a horizontal line (01 and 03 in Figure 2). In order to add more attributes to a specific token, you press the + below the token (04 in Figure 2). If you want to add another token to the query, press the button Add to the right of the last token (05 in Figure 2).
 Figure 2: The query "ora (part of speech: NOM) followed by siamo" built up with the Word sequence Builder.
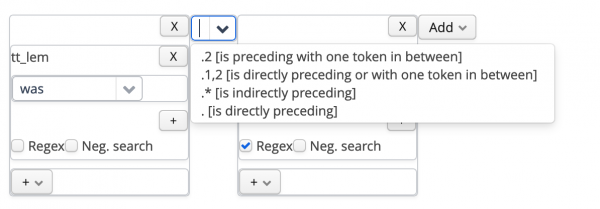
The option of defining the sequence of words in more detail is represented by the rectangle 06 in Figure 2 and explained in more detail in Figure 3, where .2 stands for a token that is preceding another one with one token in between, .1,2 represents a token that is directly preceding or with one token in between, .* represents a token that is indirectly preceding, this with any number of tokens in between, and . represents a token that is directly preceding.
 Figure 3: Describing different options for the sequence of tokens
Scope and Meta information
In the section below the Linguistic sequence (part 07 in Figure 2) you can add additional options to your query that pertain to the whole message or the whole chat as listed in section 2.4.5 Fields available.
Toolbar
When clicking Create AQL Query in the section Toolbar, your query is created (number 08 in Figure 2). Additional functions in this section are Clear the Query Builder, which is used if you want to start anew with your query and Refresh Query Builder, which you have to click if you decide to select another sub-corpus for your query.
Query Builder. General (TigerSearch like)
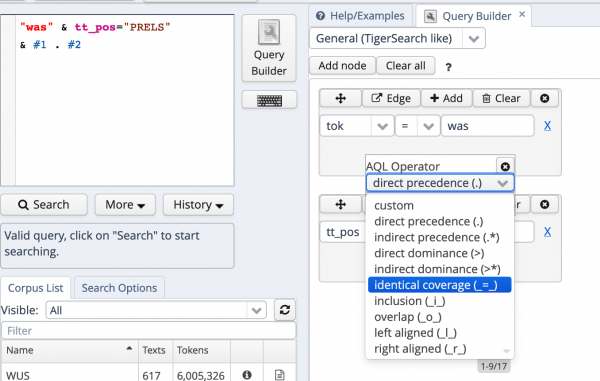
This type of query builder focuses on relationships between entities. It basically works as follows: you select an entity (ie. the value of the token) and then select another entity (eg. the part of speech that this tokens is to have) and then link the two via a relationship. Figure 4 shows how this example works.
 Figure 4: Building a query by selecting a relationship between entities
To work with this query builder, you first select all the nodes (Add node in Figure 4) required for your query (i.e. the value of the token and the PoS in the example). You then add an edge, i.e. a relationship between these two entities by clicking on the button Edge on one of your tokens. All other tokens that you have added now show a button Dock, which you can click to create an relationship between these two tokens. As can be seen inFigure 4, ten different relationships can be created.